Now it is time to export the data from LS Central and run the Scheduled run pipeline to load the data from the files into the pre-staging tables, merge into staging and from there into the data warehouse starschema tables.
Export data
You start with the export. In LS Central Saas make sure you are located in the company you want to export. If you added more than one company to Analytics you need to repeat the steps below for all companies before continuing.
-
Navigate to the Export to Azure Data Lake Storage page
-
Click the Export action from the top menu. This will start the export, go through all listed tables and display how many tables have data and will be exported in a message box.
You can follow the export in the table list - there you can see "last exported state" and when the last export was started and if there were any errors. You can also select a table from the list and click the Execution logs action from the Tables menu to view the log for a table.
This step might take some time when you run it for the first time. Especially if you are exporting from a company that has been running in SaaS for some time and contains high volumes of transactional data.
When you scroll through the list you should see Success or Never run as the status of all tables. If any tables get last exported state as Failed and errors you can simply run the export again but you should wait until all In Process tables are done.
You should let the export finish for one company at a time and then you can move over to the next company and do the initial export there in the same way, you only need to do the schema export once and the table and field configuration is global for the environment. All you need to do is to navigate the the Export to Azure Data Lake storage in the other companies and click Export.
You will then schedule exports for the companies once the initial load is complete.
Check exported data in Azure
When all data has been exported you can navigate to the storage account and container in Azure portal and verify that a Deltas folder has been created. Once you have done that you can move on to the next step.
Deactivate Modules
Before you can run the initial load of the data warehouse you need to review whether there are any modules you want to leave out of the data warehouse. This steps is totally optional and you can keep all the modules if you want to but it can improve the performance of the ETL process pipelines to only run the modules that are needed for the reports your customers want.
There are six modules and they roughly correspond to the Analytics report templates.
- Base - All dimension data for Sales and Inventory and Supply chain reports + fact tables for Sales and ACI reports
- Inventory - No additional dimensions - fact tables for Inventory and Supply chain reports
- Hospitality - Additional dimensions and fact tables used in Hospitality Analytics report
- Bookings - Additional dimensions and fact tables used in Booking Analytics report
- Finance - Additional dimensions and fact tables used in Finance Analytics report
- Hotels - Additional dimensions and fact tables used in Hotel Analytics report
When you setup a new Analytics environment all modules are enabled by default so the best course of action is to disable the modules you do not want to use before the initial load is run. This will prevent the ETL pipelines from checking lookup values for tables that are empty or loading data into tables that is then never shown in any reports.
Lets imagine that you are setting up Analytics for a bookstore. This customer is currently only doing retail and is not using any of the functionality for Bookings, Hospitality or Hotels. You can therefore disable these modules before running the initial load for this customer.
To disable a module you need to run the Enable or Disable Module pipeline from 1 - Query Setup folder in the Azure data factory. You need to run the pipeline for each module, one at a time.
-
You enter the ModuleName like it is written above, set DisableModule as true and UpdateQueryBase as false. There is no need to update query base at this point since it has not been created yet.

-
You then click OK and the pipeline is run.
-
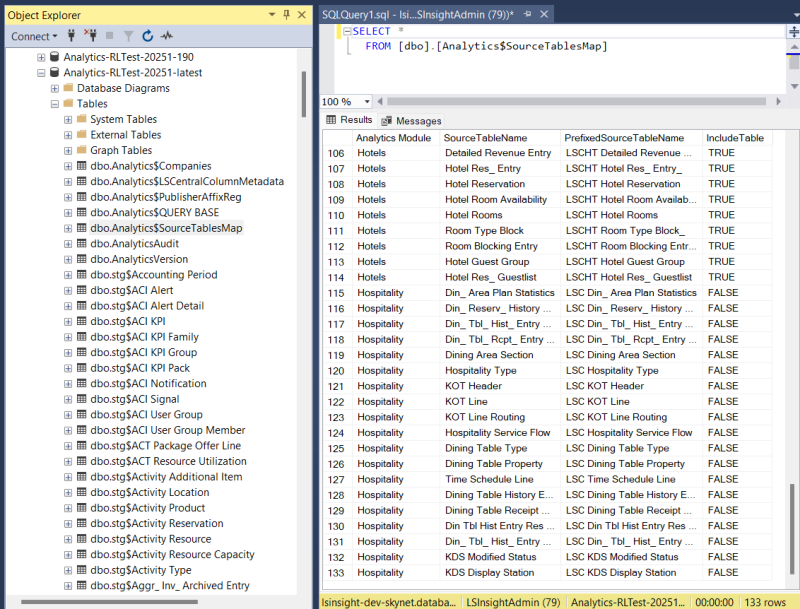
If you check Analytics$SourceTablesMap the data warehouse database you can see that all source tables with Hospitality Module have been set to IncludeTable=False. This means that the module has been disabled and no queries for these tables will be included in Analytics$QUERY BASE so no data will be loaded into staging and fact and dimension tables.
-
You can then repeat this process for the other modules (Bookings & Hotels) you want to disable as well.
Even if you have disabled a module at setup time you can always enable it later on. And if you want to you can keep all modules enabled until you decide otherwise.
Run Scheduled run - BC2ADLS staging pipeline
Now that you have deactivated the modules you do not want to run, you can start running the pipelines.
First, you need to trigger a single run of the Scheduled run - BC2ADLS staging pipeline. This pipeline triggers two other pipelines, one after the other. First, the BC2ADLS staging pipeline, which copies data from the delta files in the storage account into the prestaging tables and then triggers the merge from prestaging to staging. And then the the pipeline triggers the dimensions and fact procedure pipelines and thereby performs the initial data load of the data warehouse.
Please follow these steps:
- In the Azure Data Factory, open the Author option, the pencil icon on the left navigation menu. Here you can see the Pipelines section, with all the available pipelines. There should be 15 pipelines.
- Expand the Pipelines section and 4 - ETL Flows folder.
- Select the Scheduled Run - BC2ADLS staging pipeline.
- You then need to trigger this pipeline manually by selecting Trigger/Add trigger > Trigger now from the top menu.
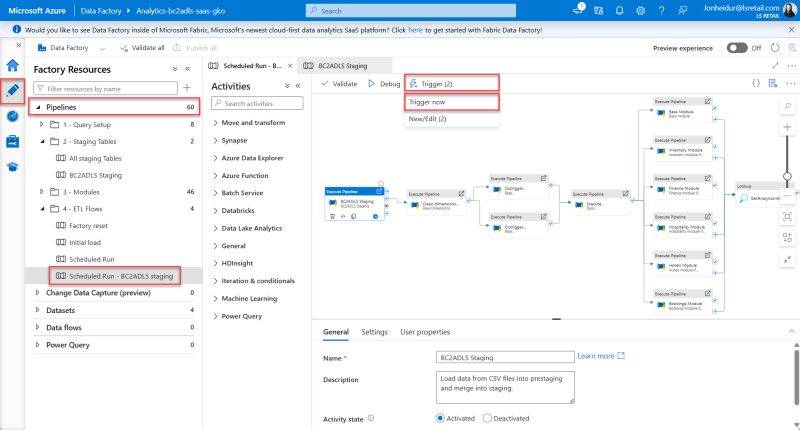
- The Pipeline run window opens. Click OK to start the run.
- This triggers the pipeline to start running and any notifications will be shown under the notification bell icon in the blue ribbon.
- This run will take a few minutes and you must wait for it to finish before you continue.
To monitor the run of the pipeline, see the pipeline monitoring guideline.
If the initial run of the pipeline does not complete and has errors, it is always good to inspect the errors to see if you can figure out what went wrong. The most common pipeline errors are connection issues. Solutions to some errors are described in the Troubleshooting Analytics documentation.
If you are unable to find the source of the error, contact Technical Support on the LS Retail Portal to get help solving the problem.
When the Scheduled run - BC2ADLS staging pipeline has completed with status Succeeded you can move on to the next step.